

What is a 404 Page and How Do you Fix It?
Why are 404s Bad for Your Website?
How do they occur?
The most common reason for error 404 pages on website :
- Deleted Page
- The page moved to a new address, without setting any redirection
- Incorrect URL
- Typing error or missing '/'
How to Find and Fix 404 Errors on Your Site
Now you know how bad 404 errors are, let’s look at how we can find them and fix them.
Finding 404 Errors
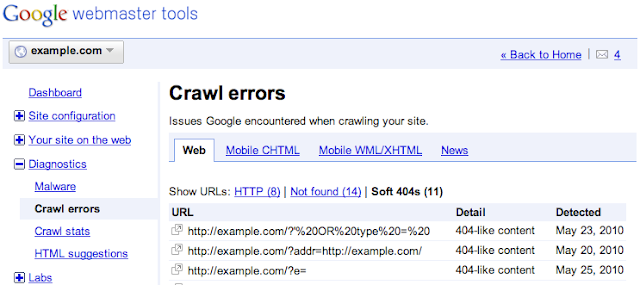
1. Google Search Console: You will find a list of all 404 pages by logging into your Google search console account and going to Diagnostics > Crawl Errors. After you click on “Not Found”, a list of all the urls that result in a 404 error will appear.
2. WordPress Plugins: Broken link checker
You’re in luck if you’re running a WordPress-based website. Broken link checker is a free WordPress plugin that searches the entire site for broken links and determines their status.
You could search all the connections that are missing, redirected, or broken from a single dashboard.
3. Serpstat : To search for 404s using Serpstat:
- Start a project < Click ‘Create’ after entering the domain name, team name, and community name.
- The ‘Domain Audit’ column will appear on the left side after the site has been added to the project list. To begin the audit, press the ‘Start audit’ button.
- When you’re done with the report, open the folder and look for all 404 pages.
- You will learn more about the error and how to resolve it here.

How to Fix 404s
The most common redirect manager for WordPress is “Redirection”. It allows you to quickly handle 301 redirects (the 301 status code means that a page has permanently moved to a new location), log 404 errors, and clean up any loose ends on your website. This will aid in the reduction of errors and the enhancement of the site’s rating.
Redirection can be used on pages with a few redirects all the way up to sites with thousands of redirects.
This plugin is over ten years old and has been highly recommended. Also, It’s completely free and easy to use.
After you complete the installation and setup, allow the plugin some time to scan and look for all broken links. Then go to Tools < Redirection. This will take you to the plugin dashboard.
From there, click on “404s” from the top-bar.

Once, you get all the broken links, redirect them to your desired url by Rediects< Add new redirect.

Just add the broken link under “Source URL” and your desired url under “Target Link” and click on “Add Redirect” button.
And just like that, all your broken links will now redirect to the target url.
This can be time consuming based on the size of your website, but it will be beneficial to your readers and, most significantly, the search engine in the long run.
0 Comments